|
I like to use multiple different color primers that i buy from SPRAYSTER.COM to save money. I have many strong opinions about primer in the wargames industry. The shocking mark up is astonishingly unjust. I save my customers a lot of money by using these other primers. I shall say in short that ALL MATT PRIMER is basically the same in regards to the purpose of wargaming. With some of these they come out a little sheen, so i simply brush them with a matt coat of varnish before painting or inking and they take paint perfectly. Check out sprayster.com. Following a mixed undercoat (leaning heavilly into brown and beige for historical accuracy of sorts) i painted the bases a dark grey (matching the base of the test model.) Many of my clients know my mental health can be u and down, so this last few days i haven't got as much done as i'd like, however i decided to trek on and get these bases done as a test to see how they matched up with the test model. I was nervous that the stamp method i employed on the group bases wouldn't look like cobble and i think i was right with just the grey/brown/beige/grey method. It looked a bit boring. I decided to pick out some of my favorite browns and add them on top picking out individual tiles. That seemed to work really well but it was a bit flat so i mixed my home made "death juice" (recipe to come soon) and some grey paint and i made a dark grey wash. After the grey wash i added a final dry brush of spaceship grey and it really popped, the contrast was there and it looks fantastic. The fit of the bases is ever so slightly tight (i have akward memories of a client once berating me because his bases didn't fit absolutely perfectly - don't worry it wasn't John, John is so nice) so i will see how they feel in a day or two when i'm done painting and then i can always sand them down a tiny bit. RUBY DRAGON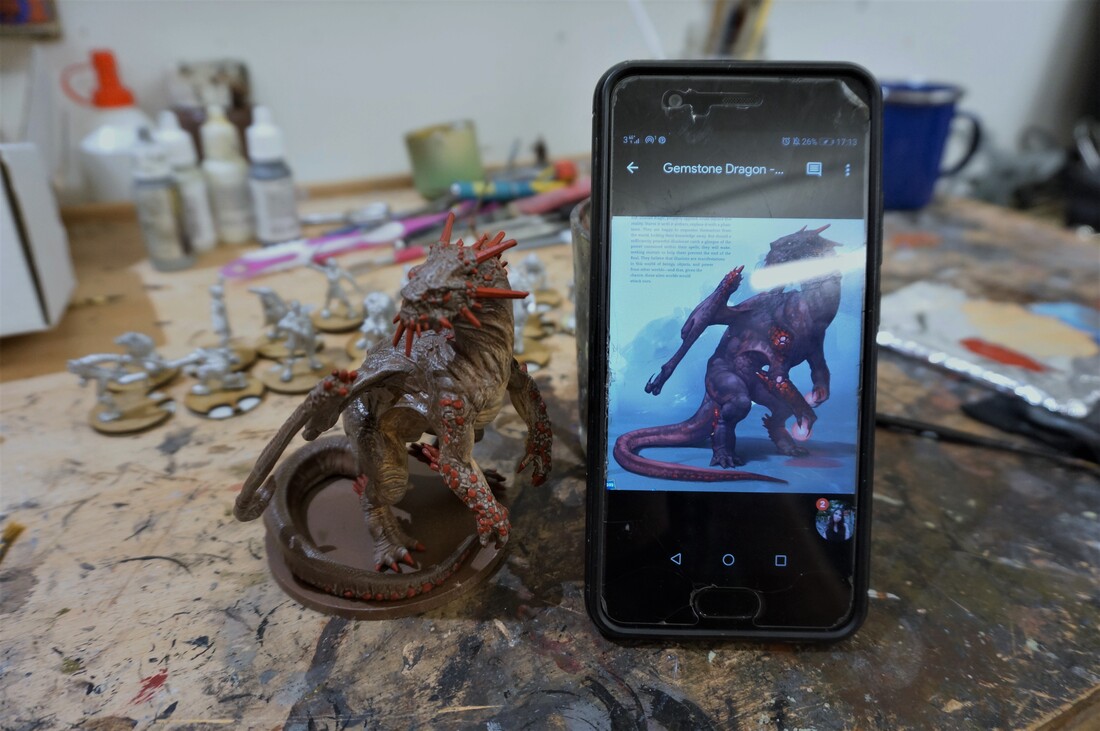 This dragon model is an exciting learning curve. I considered approaching this from a few angles. Firstly i considered dark purple and black primer worked up to red and pink with black washes, then i thought about black and worked up manually without washes to brown red. Finally i decided on a dark brown and skin tone (to develop that skin tone on the tummy of the picture) and then washes and working back up to that purple red hue. It's going to be a challenge. As it stand right now i've done the brown, the skin and the red (block colors) and started with the washes. The image is definitely very red but i'm stumping out on how to get there. I am very understanding of the creative process however and i know we shall one way or another. For the time being i'm very proud of the natural skin fade i've achieved on the tummy and can't wait to see these washes dried. Pictured above, achieveing those natural skin fades with spray, dry brushing, mottling and and overbrushing. With the majority of details picked out roughly i gave the model a liberal wash of Death Juice (my own home made black wash) mixed with Army Painter Strong tone. I think i might repeat this once dry, not sure yet. Otherwise i might just work the skin tones down to a darker set. i can't rightly decide yet.
0 Comments
Leave a Reply. |
SUBSCRIBE TO FOLLOW ALL UPDATES.
ABOUTA blog for the w.i.p element of the EZPainter process. ARCHIVES
March 2024
|
 RSS Feed
